To add an electrical outlet for a wall-mounted TV is an unchallenging job and can be done easily at home with a few tools.
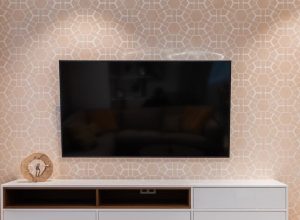
The ideal location for this wall outlet is about 1-2 inches below the top edge of the TV.
The following article will help you give your TVs a neat and professional look.
Quick Summary
The following information will be discussed in the guide:
- How to add an electrical outlet for wall mount TV?
- How to use an existing outlet?
- Tips on keeping the electrical outlet fresh
How to Add Electrical Outlet for a Wall Mount TV?
Make sure that you have the following tools and material ready before you start the process:
Tools:

- Circuit Voltage Tester
- Stud Finder
- Drywall Jab Saw
- Screwdriver
- Wire stripping tool
- Utility Knife
- Needle nose pliers
- Wire Strippers For Electrical Wires
Materials:
- 1-Gang old work box
- 14-2 or 12-2 cable (Non-Metallic)
- Wire connectors
- Duplex outlet
- Outlet cover plate
- Electrical box
In addition to these materials also make sure that you have the proper safety gear with you.
How To Use An Existing Outlet?
In case there is an existing outlet near the TV where the wire can easily pass through, there is no reason to make a new one.
You can simply take the TV cable to that outlet and pass it through without any problem.
Using an existing cable would spare you the trouble of having to make a new hole in the wall and connect electrical wiring to it.
Why People Do Not Prefer Old Outlets?

In most cases, an existing outlet box is not preferred by people for the following reasons:
- The existence of wires coming from the TV looks unappealing.
- There is a high possibility of someone tripping over the wire.
- They want their outlet wall cavity to be hidden from plain sight.
- HDMI cables and other sorts of wires may also need to pass through the cavity.
- It makes a small wall look full or cluttered.
- An old outlet may not give such a refined look to the room.
How To Add An Electrical Outlet For A Wall Mounted TV
Step 1:

When you start, turn off the circuit that you will be working on. While you do this also check the amperage of the circuit. In case of an existing outlet, replace the first one.
A cable that contains 14 gauge wire will work for a 15 Amp circuit while a cable that contains 12 gauge wire will work for a 20 Amp circuit.
To make sure that the circuit is cut, use a circuit tester.
Step 2

Find the new box. The current box will be nailed or screwed to a stud. Use the stud finder to find out if the current box is at the right or left of the stud.
The new box will be nailed right above the current stud and also on the same side.
Step 3

Cut a new hole. Trace the face of the box onto the wall. In some cases, there is a template on the box that can be used to trace out as well. Use the jab saw to cut this hole.
Work slow and make sure to not hit any existing wires or pipes that are also behind the wall.
Step 4

Push the cable. From the current outlet remove the cover plate using a screwdriver. Then pull the outlet that is attached to the box. There are one or two holes on the top of the box covered by a clamp or plug.
Loosen the clamp or punch out the clamp with the tip of a screwdriver.
How to push the cable?
To prevent any snags, crimp only an inch of the leading end of the wire before you push it in the box.
After this is done, place the new cable in the hole and push it up. Then finally through the hole pull the cable.
This is a tricky step and may require extra focus.
Step 5
Prepare the ground wires. If your existing box is made out of plastic, disconnect the bare ground wire from the green terminal. In the case of a metal box, on the back of the box, you can find a short bare wire that is connected to a green grounding screw.
Step 6

For this step, slice the sheathing on the new cable using a cable ripper. Peel this back and use a utility knife to remove it. Take the help of a wire connector to connect the new cable’s bare wire to other bare wires.
You may need to replace the connector with one that is designed for more wires.
Step 7
In this step, cut three six-inch pieces of the wire to use as pigtails. One from the white, one black, and one bare. Take off about 0.75 inches of insulations from both the white and the black pigtail.
Twist one end of the white pigtail using needle-nose pliers. Do this with the white wire you disconnected from the terminal and the white wire from the new cable.
Ensure that the length of the exposed portion is the same for each of the wires.
By using a wire connector, secure all these wires. If the box is plastic, repeat this step to connect the two black wires to the black big tail and two bare wires to the bare pigtail.
In the case of a metal box, you have already connected all the wires.
Step 8

In the box, bend a hook on each end of the disconnected wires using needle-nose pliers. On the unused silver outlet screw, connect the white wire while on the unused brass screw, connect the black wire.
If the bare wire is not already connected then connect it to the green screw.
Carefully fold the outlet wires in the box. Reconnect the outlet to the box and reattach the cover plate.
Step 9

In this step, To install the new box, push it into the drywall opening. At the bottom of the new box pull the cable. To engage the clamp wings, tighten the two screws behind the drywall.
Make sure to tighten until the box is completely secure.
Step 10

Tips on Keeping Electrical Outlets Looking Fresh
Take off the sheathing from the new cable inside the box. Remove about 0.75 inches of insulation from the black and white wires and make hooks on all three of them.
Connect the black wire on the brass terminal, the white wire to the silver terminal, and the bare wire to the green terminal.
Fold these wires in the box, use the screws to screw the outlet to the box, and put in place the cover plate. Turn on the circuit breaker connected with the new outlet. To check if the circuit breaker is live use the circuit tester.
Have a wire-free experience by plugging the TV in.
Here are some useful tips to keep your new electrical outlets looking fresh for longer:
- Make sure to put a new outlet box in the area of the wall that has the same stud as where the mounting plate is fixed.
- The new outlet location should optimally be behind the TV in a secluded place.
- Try and hide extra wire behind the TV and try to make sure there is no more than an extra foot of cables.
- Make sure the hot wire is properly covered so that it does not accidentally burn the power outlet or new wires.
- You can hang the extra wire with a little hook on the same wall and loop the new wire over it.
- If you want to pass the wire through the wall directly to new outlets behind the wall then make sure you don’t run into wall studs.
- You can even use fish tape to hold wire in place near the wall plate of the new TV.
- Make sure there are not a lot of wires cluttering the outlet behind your TV as an overload could cause the electrical system to trip.
Wrapping Things Up For Sockets With A Wall Mounted TV

We hope that you have learned the most detailed and easy process of how to add an electrical outlet for a wall mount TV.
In addition to this, we have also explained all tools and materials required with their use in the whole process.
Let us know what you think about this.
Adam F.
A/V and Home Theater Expert that focuses on providing clear as well as concise reviews for anything and everything Audio Visual. From TV's, TV Mounts, Soundbars, and Wiring, my focus is to provide expertise in everything Audio Visual focused.


